Port Knocking & Knockd Configuration
What is port knocking? Port knocking is a method of securing external facing services – explicitly blocked by firewall rules – by enabling firewall access only in the event that a correct sequence of connection attempts to random predetermined ports is attempted. Upon receipt of a correct sequence of connection attempts, the firewall rules are modified on the requested server, temporarily enabling access to the service for the requesting client.
The popular port knocking tool, Knockd, allows users to customize a variety of options to tweak their Knockd deployment. A user might customize the length of the port knocking sequence, the ports specified, the protocol (TCP/UDP), the packet’s flag type(s) (syn, ack, fin…), timeout period, and even an alternate sequence of ports to close the connection.
Before we jump into defining the steps needed to install a Knockd instance, let’s see it in action…
Preliminary Nmap Scan
To start, I have a CentOS machine on my local network (IP – 192.168.1.14) with an SSH server configured and enabled on port 22. Knockd has been enabled and a firewall rule has been configured to block all incoming traffic destined for port 22 (ssh).
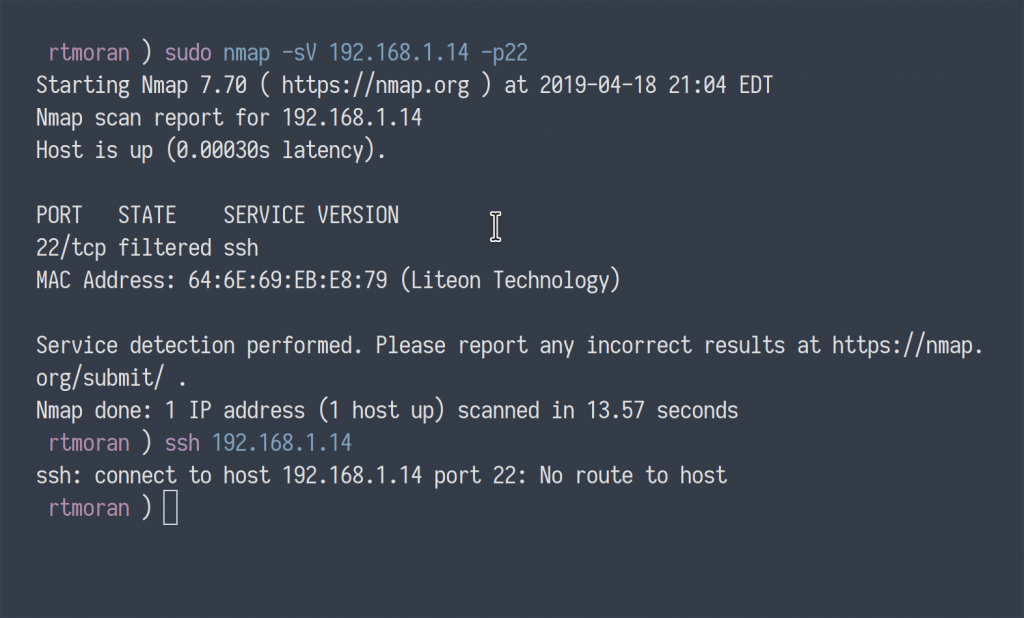
As you can see, enumeration of port 22 via Nmap returned a port filtered by the firewall. Additionally, the attempt to connect to the server over SSH fails, returning “No route to host.”
Port-knocking Script
The port knocking sequence I configured to enable access to the SSH service is as follows:
- 8283:tcp 1482:udp 5283:tcp 1817:tcp
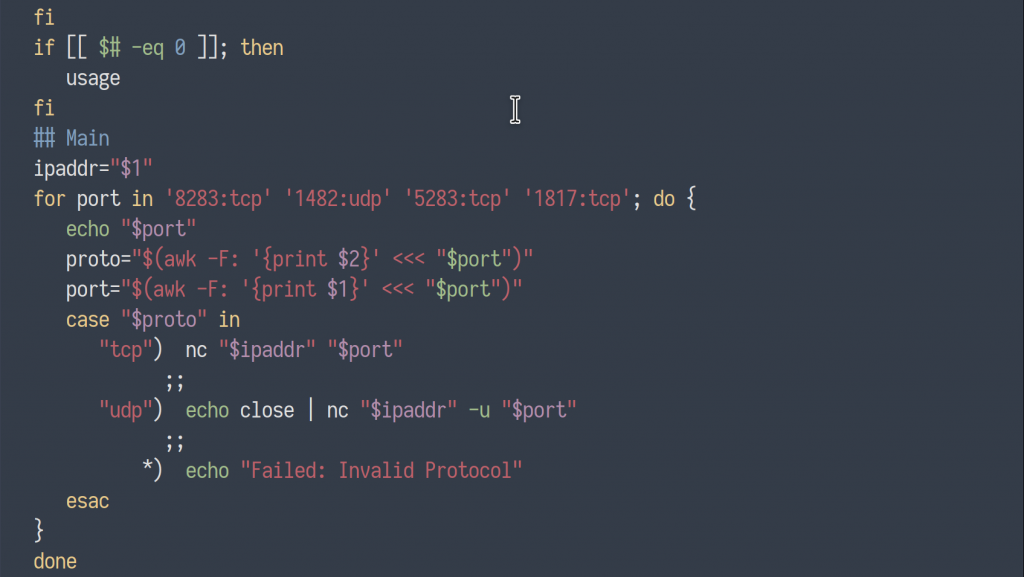
To execute the ordered sequence of ports to trigger the Knockd service on the SSH machine, I wrote a simple script utilizing Netcat to make the connection attempts.
#!/bin/bash

usage() {
echo "+--------------------------+"
echo "+      port knocker        +"
echo "+--------------------------+"
echo ""
echo "Usage: ./sshconnect <ip address>"
echo ""
exit 1
}

if [[ ($# == "--help") || $# == "-h" ]]; then
    usage
fi
if [[ $# -eq 0 ]]; then
    usage
fi

## Main
ipaddr="${1}"
for port in '8283:tcp' '1482:udp' '5283:tcp' '1817:tcp'; do {
    echo "${port}"
    proto="$(awk -F: '{print $2}' <<< "${port}")"
    port="$(awk -F: '{print $1}' <<< "${port}")"
    case "${proto}" in
        "tcp") nc "${ipaddr}" "${port}"
            ;;
        "udp") echo close | nc "${ipaddr}" -u "${port}"
            ;;
        *) echo "Failed: Invalid Protocol"
    esac
}
done
Knockd in Action
Now, lets take a look at the port knocker in action…
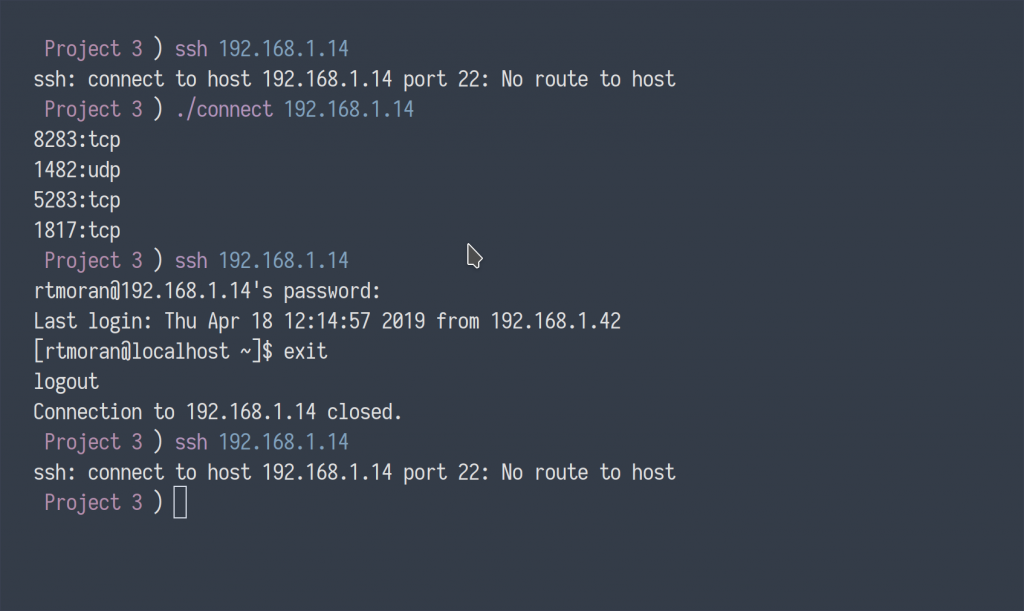
Initially, I again attempted to make a connection with the SSH server, which returned inaccessible. I then executed my port knocking script with the target IP address. The script made a sequential attempt to connect to the specified closed ports, which triggered the listening Knockd service to execute a command, temporarily updating the server’s firewall rules, which subsequently, allowed me access to login.
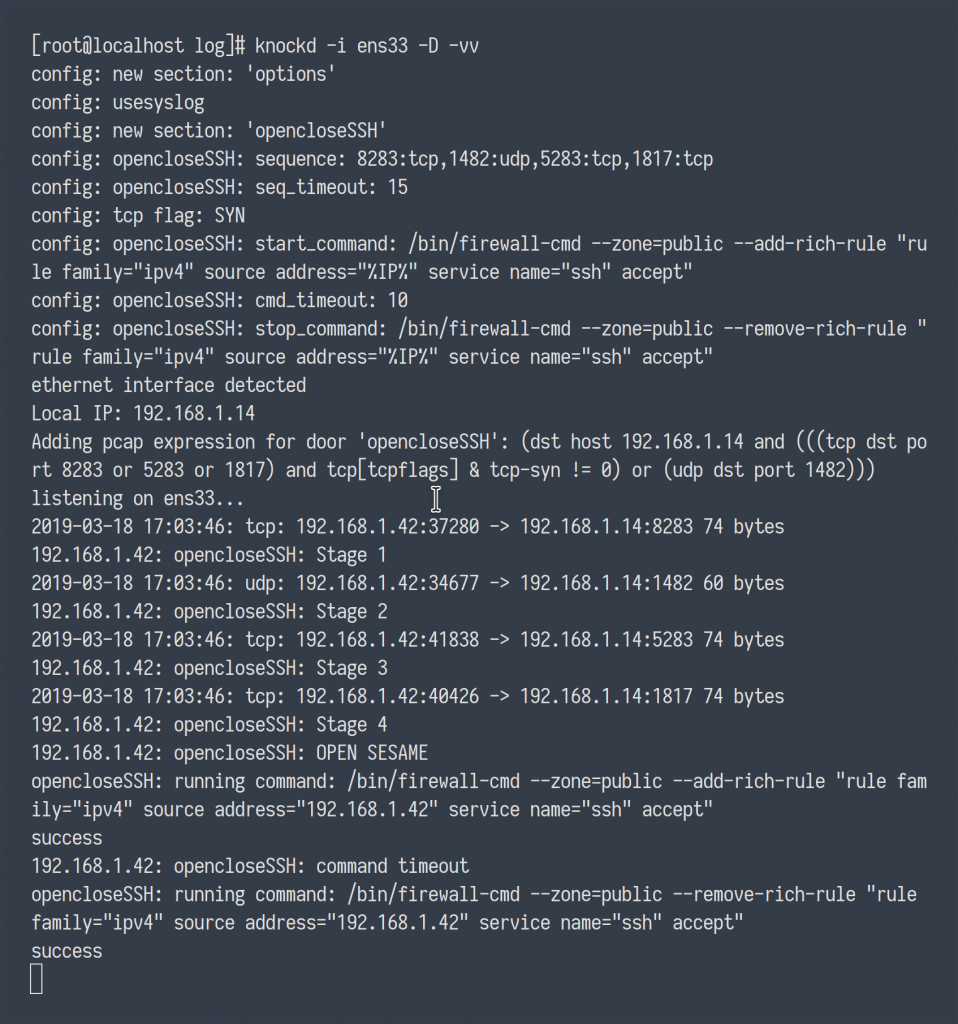
Below, I’ve also included the verbose output of the Knockd daemon in action. Notice the incoming traffic to the knock sequence ports, the Firewalld command being executed granting access, and shortly after the Firewalld command, again, deny access.
Installing Knockd for CentOS
Below is a guide for installing and deploying Knockd for CentOS. I’m referencing CentOS in this guide, however, regardless of your distribution, installation and configuration remains consistent across distributions. The greatest difference in this guide is that I will be substituting iptables rules for CentOS’s default firewall service Firewalld.
Prerequisites
- libpcap library
$ sudo yum install libpcap - Knockd
$ sudo rpm -Uvh http://li.nux.ro/download/nux/dextop/el7Server/x86_64/knock-server-0.7-1.el7.nux.x86_64.rpm - OpenSSH Server
Firwalld
Be sure to first modify your Firewalld rules to deny all traffic to your SSH server.
firewall-cmd --zone=public --remove-service=ssh --permanentfirewall-cmd --reload
Configuring Knockd
The configuration file for Knockd can be found in /etc/knockd.conf.
Knockd’s documentation offers three different examples of how Knockd can be implemented. The first example offers a 2-knock configuration. That is, one knock sequence to open access to the restricted service, and another to close access when done.
The next configuration does not use a single knocking sequence, but rather sources individually a list of different sequences, or “one-time sequences.” After each successful knock, the last used sequence is invalidated, and the next sequence will automatically be initialized. This can used to prevent an attacker from executing a replay attack after having eaves-dropped on a successful knock.
Lastly, what you see below, and what I have implemented, is a configuration which upon receiving a successful knock, the start command will execute, and a timeout counter will begin, automatically closing the connection in a specified period of time. The configuration below has been altered to utilize CentOS’s firewall framework, Firewalld, as opposed to iptables commands.
[options]
	UseSyslog

[opencloseSSH]
	sequence      = 8283,1482:udp,5283,1817
	seq_timeout   = 15
	tcpflags      = syn
	start_command = /bin/firewall-cmd --zone=public --add-rich-rule "rule family="ipv4" source address="%IP%" service name="ssh" accept"
	cmd_timeout   = 10
	stop_command  = /bin/firewall-cmd --zone=public --remove-rich-rule "rule family="ipv4" source address="%IP%" service name="ssh" accept"
Lastly, before you enable Knockd, you should make the following changes:
By default, Knockd looks to the ‘eth0’ interface. If your network interface is named otherwise, Knockd will not start. Look to the configuration file “
/etc/sysconfig/knockd” and uncomment the lineOPTIONS="-i eth0"being sure to replace ‘eth0’ with the appropriate interface. Also, a precautionary feature, designed to prevent a user from accidentally enabling Knockd and locking themselves out, the file “/etc/default/knockd” needs to be created with the line ‘START_KNOCKD=1‘ inserted within.
Start the service:
sudo systemctl enable knockd && sudo systemctl start knockd
That’s it!
Great write up!
Your netcat script is not showing, can you please repost.
Thank you for sharing.
Thanks for them heads up. I just moved my VPS, so I think I lost a few things in the process. I’ll get it back up ASAP