rtmoran.org — Cybersecurity and Linux Resource

OverTheWire Leviathan – Level 6

overthewire

Executable leviathan6 prompts the user for a 4-digit password. Reviewing the executable with ltrace, strace, and strings produces nothing obvious, so let’s move on to the next most obvious step — brute-forcing.

There’re plenty of different ways to write up a script to brute-force leviathan6‘s 4-digit password. For this instance, I’m just going to use a for-loop.

Continue reading “OverTheWire Leviathan – Level 6”

OverTheWire Leviathan – Level 5

overthewire

ltrace against SUID ELF ./leviathan5:

leviathan5@leviathan:~$ ltrace ./leviathan5 
 __libc_start_main(0x80485db, 1, 0xffffd784, 0x80486a0 
 fopen("/tmp/file.log", "r")                  = 0
 puts("Cannot find /tmp/file.log"Cannot find /tmp/file.log
 )            = 26
 exit(-1 
 +++ exited (status 255) +++
Continue reading “OverTheWire Leviathan – Level 5”

OverTheWire Leviathan – Level 4

overthewire

Executing the 32-bit ELF executable, bin, found in directory ./trash, within leviathan4‘s user directory, returns a string of binary characters. There are plenty of tools that can be used to translate the binary text to ascii characters, and in this instance I used Perl.

Continue reading “OverTheWire Leviathan – Level 4”

OverTheWire Leviathan – Level 3

overthewire

Again, by reviewing the dynamic library calls of the SETUID ELF, level3, found within user leviathan3‘s home directory, we can observe another strcmp() call comparing the inputted password to the accepted value.

Continue reading “OverTheWire Leviathan – Level 3”

OverTheWire Leviathan – Level 2

overthewire

When listing leviathan2‘s user directory we again find an ELF 32-bit executable, printfile, with the SETUID bit set.

ltrace output:

leviathan2@leviathan:~$ ltrace ./printfile '/etc/leviathan_pass/leviathan2'
 __libc_start_main(0x804852b, 2, 0xffffd764, 0x8048610 
 access("/etc/leviathan_pass/leviathan2", 4)      = 0
 snprintf("/bin/cat /etc/leviathan_pass/lev"…, 511, "/bin/cat %s", "/etc/leviathan_pass/leviathan2") = 39
 geteuid()                                        = 12002
 geteuid()                                        = 12002
 setreuid(12002, 12002)                           = 0
 system("/bin/cat /etc/leviathan_pass/lev"…ougahZi8Ta
  
 --- SIGCHLD (Child exited) ---
 <… system resumed> )                           = 0
 +++ exited (status 0) +++
Continue reading “OverTheWire Leviathan – Level 2”

OverTheWire Leviathan – Level 1

overthewire

Listing the directory of user leviathan1 reveals a ELF 32-bit executable with it’s SETUID bit set.

leviathan1@leviathan:~$ ls -la
 total 28
 drwxr-xr-x  2 root       root       4096 Oct 29  2018 .
 drwxr-xr-x 10 root       root       4096 Oct 29  2018 ..
 -rw-r--r--  1 root       root        220 May 15  2017 .bash_logout
 -rw-r--r--  1 root       root       3526 May 15  2017 .bashrc
 -r-sr-x---  1 leviathan2 leviathan1 7452 Oct 29  2018 check
 -rw-r--r--  1 root       root        675 May 15  2017 .profile
 leviathan1@leviathan:~$ file check
 check: setuid ELF 32-bit LSB executable, Intel 80386, version 1 (SYSV), dynamically linked, interpreter /lib/ld-linux.so.2, for GNU/Linux 2.6.32, BuildID[sha1]=c735f6f3a3a94adcad8407cc0fda40496fd765dd, not stripped
Continue reading “OverTheWire Leviathan – Level 1”

OverTheWire Leviathan – Level 0

overthewire

Inspection of leviathan0‘s user directory reveals a hidden directory .backup. Within the .backup/ directory reveals the html file, bookmarks.html.

Seeing as we are looking for the password for user leviathan1, let’s attempt to grep the bookmarks.html file for a password.

grep password bookmarks.html
Continue reading “OverTheWire Leviathan – Level 0”

Port Knocking & Knockd Configuration

What is port knocking? Port knocking is a method of securing external facing services – explicitly blocked by firewall rules – by enabling firewall access only in the event that a correct sequence of connection attempts to random predetermined ports is attempted. Upon receipt of a correct sequence of connection attempts, the firewall rules are modified on the requested server, temporarily enabling access to the service for the requesting client.

The popular port knocking tool, Knockd, allows users to customize a variety of options to tweak their Knockd deployment. A user might customize the length of the port knocking sequence, the ports specified, the protocol (TCP/UDP), the packet’s flag type(s) (syn, ack, fin…), timeout period, and even an alternate sequence of ports to close the connection.

Before we jump into defining the steps needed to install a Knockd instance, let’s see it in action…

Preliminary Nmap Scan

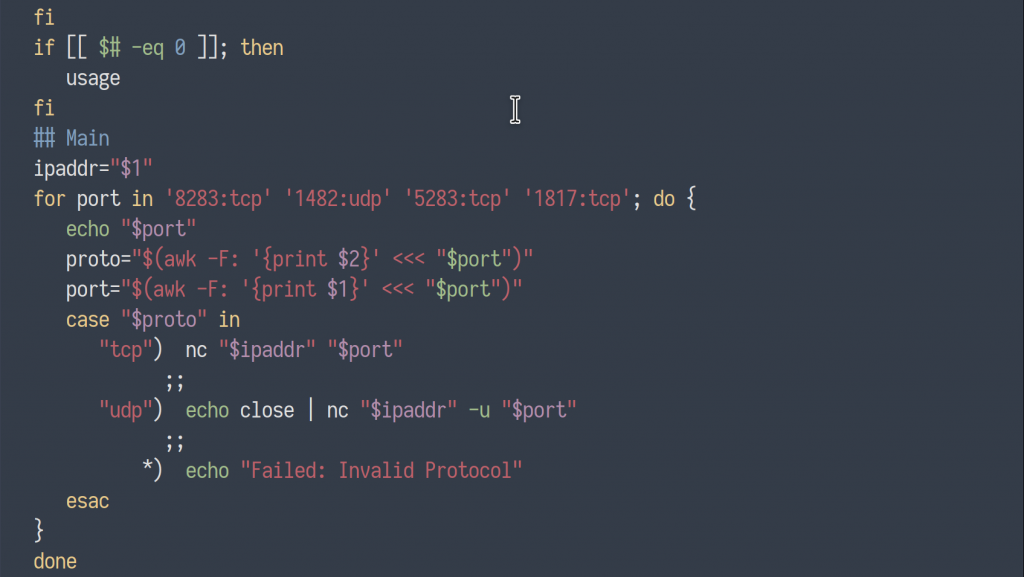
To start, I have a CentOS machine on my local network (IP – 192.168.1.14) with an SSH server configured and enabled on port 22. Knockd has been enabled and a firewall rule has been configured to block all incoming traffic destined for port 22 (ssh).

Continue reading “Port Knocking & Knockd Configuration”

CentOS Router Configuration for a Web Server

I wanted to follow up a previous post, where I described the process of configuring a CentOS router for the intention of creating a separate, internal LAN. There we simply deployed a router to separate an external WAN from our LAN and configured the router to pass along all traffic between the two interfaces.

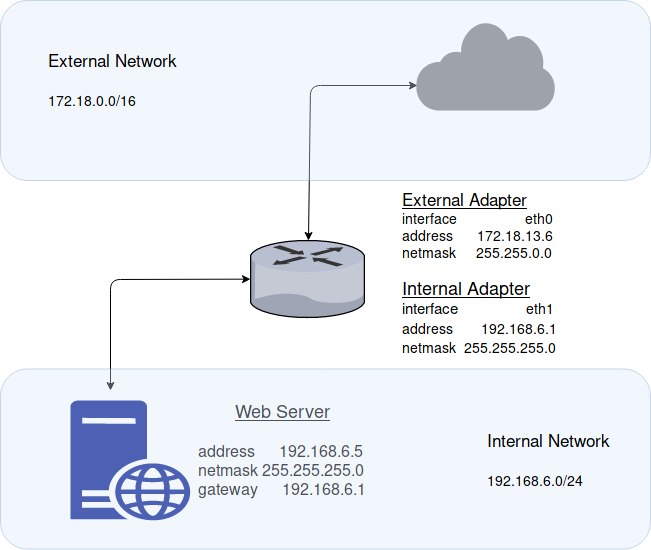
This time I wanted to deploy a router for the purpose of serving content from an internal web server, to an external LAN or WAN.

While this is something that I used recently for a local hackathon, I believe it has greater “real world” application, and can be modified only slightly to accommodate the deployment of other services or applications.

Continue reading “CentOS Router Configuration for a Web Server”

CentOS Router: Configuration in Vmware

In preparation for an upcoming hackathon, I began working with CentOS as a means to route traffic between two VMware machines: a ParrotOS machine, and a Metasploitable2 machine – both configured on different subnets.

For this tutorial I used the following:

  • VMware Workstation 15
  • ParrotOS
  • Metasploitable2
  • CentOS (Minimal Installation)

CentOS Router Configuration

First, let’s configure the CentOS router to forward traffic between the ParrotOS machine (residing on network 192.168.10.0) and the Metasploitable2 machine (residing on network 192.168.20.0).

Continue reading “CentOS Router: Configuration in Vmware”

Installing Metasploitable 3 for Windows 10


When tasked with the installation of Metasploitable 3, unlike its predecessor, Metasploitable 2, users will be met, not with an .iso file, prebuilt VMware or VBox file, but with a Github repository containing all the files needed to build the virtual environment themselves.

Metasploitable 3 is different from its predecessor, especially, in that this new method of installation allows users to build and update machines far easier than before.  The vulnerable machine can also be deployed on different OS’s including Windows Server or a Linux distro, such as, Ubuntu.

While there are many tutorials walking users through the installation of Metasploitable 3, I found that the installation required a minor amount of tweaking to be successful.


Continue reading “Installing Metasploitable 3 for Windows 10”

Over the Wire’s Bandit Challenge – Level 20

overthewire

Level 20 – bandit – overthewire

Level Instructions:

“There is a setuid binary in the homedirectory that does the following: it makes a connection to localhost on the port you specify as a commandline argument. It then reads a line of text from the connection and compares it to the password in the previous level (bandit20). If the password is correct, it will transmit the password for the next level (bandit21).

NOTE: Try connecting to your own network daemon to see if it works as you think”

Continue reading “Over the Wire’s Bandit Challenge – Level 20”

Over the Wire’s Bandit Challenge – Level 19

overthewire

Level 19 – bandit – overthewire

Level Instructions:

“To gain access to the next level, you should use the setuid binary in the homedirectory. Execute it without arguments to find out how to use it. The password for this level can be found in the usual place (/etc/bandit_pass), after you have used the setuid binary.”


bandit19@bandit:~$ ls -la
total 28
drwxr-xr-x  2 root     root     4096 Dec 28  2017 .
drwxr-xr-x 42 root     root     4096 Jul 22 18:42 ..
-rw-r--r--  1 root     root      220 Sep  1  2015 .bash_logout
-rw-r--r--  1 root     root     3771 Sep  1  2015 .bashrc
-rw-r--r--  1 root     root      655 Jun 24  2016 .profile
-rwsr-x---  1 bandit20 bandit19 7408 Dec 28  2017 bandit20-do
bandit19@bandit:~$ ./bandit20-do
Run a command as another user.
  Example: ./bandit20-do id
bandit19@bandit:~$ ./bandit20-do id
uid=11019(bandit19) gid=11019(bandit19) euid=11020(bandit20) groups=11019(bandit19)
bandit19@bandit:~$ cat /etc/bandit_pass/bandit20
cat: /etc/bandit_pass/bandit20: Permission denied
bandit19@bandit:~$ ./bandit20-do cat /etc/bandit_pass/bandit20
GbKksEFF4yrVs6il55v6gwY5aVje5f0j

Printing the contents of the home directory reveals an executable, ‘bandit20-do’, with setuid flag set.  Running the command without passing an argument reveals a bit of information into the programs function.

Continue reading “Over the Wire’s Bandit Challenge – Level 19”

Over the Wire’s Bandit Challenge – Level 18

overthewire

Level 18 – bandit – overthewire

Level Instructions:

“The password for the next level is stored in a file readme in the homedirectory. Unfortunately, someone has modified .bashrc to log you out when you log in with SSH.”


bandit17@bandit:~$ ssh bandit18@localhost
The authenticity of host 'localhost (127.0.0.1)' can't be established.
ECDSA key fingerprint is SHA256:98UL0ZWr85496EtCRkKlo20X3OPnyPSB5tB5RPbhczc.
Are you sure you want to continue connecting (yes/no)? yes
...
...
...
Byebye !
Connection to localhost closed.
bandit17@bandit:~$ ssh bandit18@localhost cat readme
The authenticity of host 'localhost (127.0.0.1)' can't be established.
ECDSA key fingerprint is SHA256:98UL0ZWr85496EtCRkKlo20X3OPnyPSB5tB5RPbhczc.
Are you sure you want to continue connecting (yes/no)? yes
...
...
...
bandit18@localhost's password:
IueksS7Ubh8G3DCwVzrTd8rAVOwq3M5x

As hinted in the instructions for level 17 upon logging into bandit18 we receive a ‘Byebye !’ message right before our connection is automatically terminated.

Since we know that the password resides in a readme file within the home directory, we can append ‘cat readme’ to our connection command to print the contents of that file before our connection is terminated.

Over the Wire’s Bandit Challenge – Level 17

overthewire

Level Instructions:

“There are 2 files in the homedirectory: passwords.old and passwords.new. The password for the next level is in passwords.new and is the only line that has been changed between passwords.old and passwords.new

NOTE: if you have solved this level and see ‘Byebye!’ when trying to log into bandit18, this is related to the next level, bandit19.”


bandit17@bandit:~$ ls -la
total 40
drwxr-xr-x  3 root     root     4096 Dec 28  2017 .
drwxr-xr-x 42 root     root     4096 Jul 22 18:42 ..
-rw-r-----  1 bandit17 bandit17   33 Dec 28  2017 .bandit16.password
-rw-r--r--  1 root     root      220 Sep  1  2015 .bash_logout
-rw-r--r--  1 root     root     3771 Sep  1  2015 .bashrc
-rw-r--r--  1 root     root      655 Jun 24  2016 .profile
drwxr-xr-x  2 root     root     4096 Dec 28  2017 .ssh
-rw-r-----  1 bandit17 bandit17 1704 Dec 28  2017 .ssl-cert-snakeoil.key
-rw-r-----  1 bandit18 bandit17 3300 Dec 28  2017 passwords.new
-rw-r-----  1 bandit18 bandit17 3300 Dec 28  2017 passwords.old
bandit17@bandit:~$ diff passwords.old passwords.new
42c42
< 6vcSC74ROI95NqkKaeEC2ABVMDX9TyUr
---
> kfBf3eYk5BPBRzwjqutbbfE887SVc5Yd

Using the ‘diff’ command we can compare the contents of passwords.old and passwords.new.

The command will print the comparable differences between the files, revealing line ‘ kfBf3eYk5BPBRzwjqutbbfE887SVc5Yd ‘; our password for bandit18.

Over the Wire’s Bandit Challenge – Level 16

overthewire

Level Instructions:

“The credentials for the next level can be retrieved by submitting the password of the current level to a port on localhost in the range 31000 to 32000. First find out which of these ports have a server listening on them. Then find out which of those speak SSL and which don’t. There is only 1 server that will give the next credentials, the others will simply send back to you whatever you send to it.”


bandit16@bandit:~$ nmap -sV -A -p 31000-32000 localhost | grep open
31046/tcp open  echo
31518/tcp open  ssl/echo
31691/tcp open  echo
31790/tcp open  ssl/unknown
31960/tcp open  echo
bandit16@bandit:~$ openssl s_client -connect localhost:31790 -quiet
depth=0 CN = bandit
verify error:num=18:self signed certificate
verify return:1
depth=0 CN = bandit
verify return:1
cluFn7wTiGryunymYOu4RcffSxQluehd
Correct!
-----BEGIN RSA PRIVATE KEY-----
MIIEogIBAAKCAQEAvmOkuifmMg6HL2YPIOjon6iWfbp7c3jx34YkYWqUH57SUdyJ
imZzeyGC0gtZPGujUSxiJSWI/oTqexh+cAMTSMlOJf7+BrJObArnxd9Y7YT2bRPQ
Ja6Lzb558YW3FZl87ORiO+rW4LCDCNd2lUvLE/GL2GWyuKN0K5iCd5TbtJzEkQTu
DSt2mcNn4rhAL+JFr56o4T6z8WWAW18BR6yGrMq7Q/kALHYW3OekePQAzL0VUYbW
JGTi65CxbCnzc/w4+mqQyvmzpWtMAzJTzAzQxNbkR2MBGySxDLrjg0LWN6sK7wNX
x0YVztz/zbIkPjfkU1jHS+9EbVNj+D1XFOJuaQIDAQABAoIBABagpxpM1aoLWfvD
KHcj10nqcoBc4oE11aFYQwik7xfW+24pRNuDE6SFthOar69jp5RlLwD1NhPx3iBl
J9nOM8OJ0VToum43UOS8YxF8WwhXriYGnc1sskbwpXOUDc9uX4+UESzH22P29ovd
d8WErY0gPxun8pbJLmxkAtWNhpMvfe0050vk9TL5wqbu9AlbssgTcCXkMQnPw9nC
YNN6DDP2lbcBrvgT9YCNL6C+ZKufD52yOQ9qOkwFTEQpjtF4uNtJom+asvlpmS8A
vLY9r60wYSvmZhNqBUrj7lyCtXMIu1kkd4w7F77k+DjHoAXyxcUp1DGL51sOmama
+TOWWgECgYEA8JtPxP0GRJ+IQkX262jM3dEIkza8ky5moIwUqYdsx0NxHgRRhORT
8c8hAuRBb2G82so8vUHk/fur85OEfc9TncnCY2crpoqsghifKLxrLgtT+qDpfZnx
SatLdt8GfQ85yA7hnWWJ2MxF3NaeSDm75Lsm+tBbAiyc9P2jGRNtMSkCgYEAypHd
HCctNi/FwjulhttFx/rHYKhLidZDFYeiE/v45bN4yFm8x7R/b0iE7KaszX+Exdvt
SghaTdcG0Knyw1bpJVyusavPzpaJMjdJ6tcFhVAbAjm7enCIvGCSx+X3l5SiWg0A
R57hJglezIiVjv3aGwHwvlZvtszK6zV6oXFAu0ECgYAbjo46T4hyP5tJi93V5HDi
Ttiek7xRVxUl+iU7rWkGAXFpMLFteQEsRr7PJ/lemmEY5eTDAFMLy9FL2m9oQWCg
R8VdwSk8r9FGLS+9aKcV5PI/WEKlwgXinB3OhYimtiG2Cg5JCqIZFHxD6MjEGOiu
L8ktHMPvodBwNsSBULpG0QKBgBAplTfC1HOnWiMGOU3KPwYWt0O6CdTkmJOmL8Ni
blh9elyZ9FsGxsgtRBXRsqXuz7wtsQAgLHxbdLq/ZJQ7YfzOKU4ZxEnabvXnvWkU
YOdjHdSOoKvDQNWu6ucyLRAWFuISeXw9a/9p7ftpxm0TSgyvmfLF2MIAEwyzRqaM
77pBAoGAMmjmIJdjp+Ez8duyn3ieo36yrttF5NSsJLAbxFpdlc1gvtGCWW+9Cq0b
dxviW8+TFVEBl1O4f7HVm6EpTscdDxU+bCXWkfjuRb7Dy9GOtt9JPsX8MBTakzh3
vBgsyi/sN3RqRBcGU40fOoZyfAMT8s1m/uYv52O6IgeuZ/ujbjY=
-----END RSA PRIVATE KEY-----
bandit16@bandit:~$ mkdir /tmp/rtm2
bandit16@bandit:~$ nano /tmp/rtm2/sshkey

[PASTE CONTENTS OF PRIVATE KEY INTO EMPTY FILE]

bandit16@bandit:~$ chmod 600 /tmp/rtm2/sshkey
bandit16@bandit:~$ ssh -i /tmp/rtm2/sshkey bandit17@localhost

We begin by performing an Nmap scan for services running on open ports between 31000 and 32000.  The output is piped through grep for the sake of neatness.

We find five ports reported open, three of which report their services as echo.  Not what we’re interested in.  We also find two ssl services listening, however, one is also running echo.

We attempt to make a connection with port 31790, inputing the previous password, and we are returned with what appears to be the private ssh key for bandit17!

Before we can use it to access bandit17, we first need to create a new directory within /tmp. Using nano (or your preferred text editor) we create a new text file within and paste the contents of the private ssh key into the empty file.

If we attempt from here to now login to bandit17, using the ssh key file we just created, we will be met with an error.  Without first locking down the permissions of the ssh key file using ‘chmod’, we will be returned with an “Unprotected Private Key File!” warning.  Modifying the permissions to 600 will remedy this issue.

Over the Wire’s Bandit Challenge – Level 15

overthewire

Level Instructions:

“The password for the next level can be retrieved by submitting the password of the current level to port 30001 on localhost using SSL encryption.

Helpful note: Getting “HEARTBEATING” and “Read R BLOCK”? Use -ign_eof and read the “CONNECTED COMMANDS” section in the manpage. Next to ‘R’ and ‘Q’, the ‘B’ command also works in this version of that command…”


bandit15@bandit:~$ openssl s_client -connect localhost:30001 -quiet
depth=0 CN = bandit
verify error:num=18:self signed certificate
verify return:1
depth=0 CN = bandit
verify return:1
BfMYroe26WYalil77FoDi9qh59eK5xNr
Correct!
cluFn7wTiGryunymYOu4RcffSxQluehd

We use the command ‘openssl’ to establish a secure connection over port 30001.  The directions hint at possible output errors you may receive and points to appending your command with ‘-ign_eof’ which prevents the connection from being terminated once end of file is reached in the input.  Above I used the switch ‘-quiet’ for it not only implicitly passes the ‘-ign_eof” switch, but also inhibits the printing of session and certificate information, cleaning up the output a bit for this particular task.

Over the Wire’s Bandit Challenge – Level 14

overthewire

Level Instructions:

“The password for the next level can be retrieved by submitting the password of the current level to port 30000 on localhost.”


bandit14@bandit:~$ cat /etc/bandit_pass/bandit14
4wcYUJFw0k0XLShlDzztnTBHiqxU3b3e
bandit14@bandit:~$ nc localhost 30000
4wcYUJFw0k0XLShlDzztnTBHiqxU3b3e
Correct!
BfMYroe26WYalil77FoDi9qh59eK5xNr

First, we need to print out the password to the current user bandit14.  The location of the password /etc/bandit_pass/bandit14 was revealed in the previous challenge.  Next we can establish a connection with localhost:30000 using either netcat or telnet.  We paste the current password, once connected, and the password for bandit15 is returned.

Over the Wire’s Bandit Challenge – Level 13

overthewire

Level Instructions:

“The password for the next level is stored in /etc/bandit_pass/bandit14 and can only be read by user bandit14. For this level, you don’t get the next password, but you get a private SSH key that can be used to log into the next level. Note: localhost is a hostname that refers to the machine you are working on.”


bandit13@bandit:~$ ls -la
total 24
drwxr-xr-x  2 root     root     4096 Dec 28  2017 .
drwxr-xr-x 42 root     root     4096 Jul 22 18:42 ..
-rw-r--r--  1 root     root      220 Sep  1  2015 .bash_logout
-rw-r--r--  1 root     root     3771 Sep  1  2015 .bashrc
-rw-r--r--  1 root     root      655 Jun 24  2016 .profile
-rw-r-----  1 bandit14 bandit13 1679 Dec 28  2017 sshkey.private
bandit13@bandit:~$ ssh -i ./sshkey.private bandit14@localhost

In level 13, as instructed, we are not provided with a password to access bandit14.  We are, however, provided with the private ssh key which can be used in lieu of a login password by passing the switch ‘-i [location of private ssh key]’

Over the Wire’s Bandit Challenge – Level 12

overthewire

Level Instructions:

“The password for the next level is stored in the file data.txt, which is a hexdump of a file that has been repeatedly compressed. For this level it may be useful to create a directory under /tmp in which you can work using mkdir. For example: mkdir /tmp/myname123. Then copy the datafile using cp, and rename it using mv (read the manpages!).”


bandit12@bandit:~$ ls -la
total 24
drwxr-xr-x  2 root     root     4096 Dec 28  2017 .
drwxr-xr-x 42 root     root     4096 Jul 22 18:42 ..
-rw-r--r--  1 root     root      220 Sep  1  2015 .bash_logout
-rw-r--r--  1 root     root     3771 Sep  1  2015 .bashrc
-rw-r--r--  1 root     root      655 Jun 24  2016 .profile
-rw-r-----  1 bandit13 bandit12 2646 Dec 28  2017 data.txt
bandit12@bandit:~$ mkdir /tmp/rtm
bandit12@bandit:~$ cp data.txt /tmp/rtm
bandit12@bandit:~$ cd /tmp/rtm
bandit12@bandit:/tmp/rtm$ file data.txt
data.txt: ASCII text
bandit12@bandit:/tmp/rtm$ xxd -r data.txt > data_rev
bandit12@bandit:/tmp/rtm$ file data_rev
data_rev: gzip compressed data, was "data2.bin", last modified: Thu Dec 28 13:34:36 2017, 
   max compression, from Unix
bandit12@bandit:/tmp/rtm$ zcat data_rev > data_zcat
bandit12@bandit:/tmp/rtm$ file data_zcat
data_zcat: bzip2 compressed data, block size = 900k
bandit12@bandit:/tmp/rtm$ bzip2 -d data_zcat
bzip2: Can't guess original name for data_zcat -- using data_zcat.out
bandit12@bandit:/tmp/rtm$ file data_zcat.out
data_zcat.out: gzip compressed data, was "data4.bin", last modified: Thu Dec 28 13:34:36 
   2017, max compression, from Unix
bandit12@bandit:/tmp/rtm$ zcat data_zcat.out > data4
bandit12@bandit:/tmp/rtm$ file data4
data4: POSIX tar archive (GNU)
bandit12@bandit:/tmp/rtm$ tar -xvf data4
data5.bin
bandit12@bandit:/tmp/rtm$ file data5.bin
data5.bin: POSIX tar archive (GNU)
bandit12@bandit:/tmp/rtm$ tar -xvf data5.bin
data6.bin
bandit12@bandit:/tmp/rtm$ file data6.bin
data6.bin: bzip2 compressed data, block size = 900k
bandit12@bandit:/tmp/rtm$ bzip2 -d data6.bin
bzip2: Can't guess original name for data6.bin -- using data6.bin.out
bandit12@bandit:/tmp/rtm$ file data6.bin.out
data6.bin.out: POSIX tar archive (GNU)
bandit12@bandit:/tmp/rtm$ tar -xvf data6.bin.out
data8.bin
bandit12@bandit:/tmp/rtm$ file data8.bin
data8.bin: gzip compressed data, was "data9.bin", last modified: Thu Dec 28 13:34:36 2017, 
   max compression, from Unix
bandit12@bandit:/tmp/rtm$ zcat data8.bin > data8_zcat
bandit12@bandit:/tmp/rtm$ file data8_zcat
data8_zcat: ASCII text
bandit12@bandit:/tmp/rtm$ cat data8_zcat
The password is 8ZjyCRiBWFYkneahHwxCv3wb2a1ORpYL

As mentioned in the instructions, the password for bandit13 resides in data.txt and has been repeatedly  compressed.  First, we create a directory within /tmp to allow us space to work and a location to which we have write privileges to copy data.txt.  Next, we will essentially repeat a process in which we check the file type using the ‘file’ command, and then extract the contents of the file using tools dependent on the output of the file type.

‘xxd -r’ is used to revert from hexdump to binary.
If the output of the file is tar, extract using ‘tar -xvf’; if the output is bzip2, use ‘bzip2 -d’; zip, zcat.

Over the Wire’s Bandit Challenge – Level 11

overthewire

Level 11 – bandit – overthewire

Level Instructions:

“The password for the next level is stored in the file data.txt, where all lowercase (a-z) and uppercase (A-Z) letters have been rotated by 13 positions.”


bandit11@bandit:~$ ls -la
total 24
drwxr-xr-x  2 root     root     4096 Dec 28  2017 .
drwxr-xr-x 42 root     root     4096 Jul 22 18:42 ..
-rw-r--r--  1 root     root      220 Sep  1  2015 .bash_logout
-rw-r--r--  1 root     root     3771 Sep  1  2015 .bashrc
-rw-r--r--  1 root     root      655 Jun 24  2016 .profile
-rw-r-----  1 bandit12 bandit11   49 Dec 28  2017 data.txt
bandit11@bandit:~$ cat data.txt
Gur cnffjbeq vf 5Gr8L4qetPEsPk8htqjhRK8XSP6x2RHh
bandit11@bandit:~$ cat data.txt | tr [:alpha:] 'N-ZA-Mn-za-m'
The password is 5Te8Y4drgCRfCx8ugdwuEX8KFC6k2EUu

The password in level 11 has been encrypted by ROT13, a process that advances each letter character by 13.  By piping the contents of the file into the tr (translate) command we can first specify the types of characters we would like to translate (all alphanumerical; A-Za-z) and secondly order how we would like those characters transposed (A-Za-z –>> N-ZA-Mn-za-m).

Over the Wire’s Bandit Challenge – Level 10

overthewire

Level 10 – bandit – overthewire

Level Instructions:

“The password for the next level is stored in the file data.txt, which contains base64 encoded data.”


bandit10@bandit:~$ ls -la
total 24
drwxr-xr-x  2 root     root     4096 Dec 28  2017 .
drwxr-xr-x 42 root     root     4096 Jul 22 18:42 ..
-rw-r--r--  1 root     root      220 Sep  1  2015 .bash_logout
-rw-r--r--  1 root     root     3771 Sep  1  2015 .bashrc
-rw-r--r--  1 root     root      655 Jun 24  2016 .profile
-rw-r-----  1 bandit11 bandit10   69 Dec 28  2017 data.txt
bandit10@bandit:~$ cat data.txt
VGhlIHBhc3N3b3JkIGlzIElGdWt3S0dzRlc4TU9xM0lSRnFyeEUxaHhUTkViVVBSCg==
bandit10@bandit:~$ cat data.txt | base64 -d
The password is IFukwKGsFW8MOq3IRFqrxE1hxTNEbUPR

The password in level 10 has been encoded in base64, as detailed in the instructions.  Printing the contents of data.txt reveals a seemingly random string of characters appended with “==”.  By piping the contents of the file into base64 with the switch -d we are able to decrypt the password for level 11.

Over the Wire’s Bandit Challenge – Level 9

overthewire

Level 09 – bandit – overthewire

Level Instructions:

“The password for the next level is stored in the file data.txt in one of the few human-readable strings, beginning with several ‘=’ characters.”


bandit9@bandit:~$ ls -la
total 40
drwxr-xr-x  2 root     root     4096 Dec 28  2017 .
drwxr-xr-x 42 root     root     4096 Jul 22 18:42 ..
-rw-r--r--  1 root     root      220 Sep  1  2015 .bash_logout
-rw-r--r--  1 root     root     3771 Sep  1  2015 .bashrc
-rw-r--r--  1 root     root      655 Jun 24  2016 .profile
-rw-r-----  1 bandit10 bandit9 19379 Dec 28  2017 data.txt
bandit9@bandit:~$ file data.txt
data.txt: data
bandit9@bandit:~$ strings data.txt | grep "=="
========== theP`
========== password
L========== isA
========== truKLdjsbJ5g7yyJ2X2R0o3a5HQJFuLk

Because the majority of data.txt is not human readable, as revealed by the instructions, we use the command ‘strings’ to access the contents of the file, piping its output into grep, and filtering out those lines with “==”.

Over the Wire’s Bandit Challenge – Level 8

overthewire

Level 08 – bandit – overthewire

Level Instructions:

“The password for the next level is stored in the file data.txt and is the only line of text that occurs only once”


bandit8@bandit:~$ ls -la
total 56
drwxr-xr-x  2 root    root     4096 Dec 28  2017 .
drwxr-xr-x 42 root    root     4096 Jul 22 18:42 ..
-rw-r--r--  1 root    root      220 Sep  1  2015 .bash_logout
-rw-r--r--  1 root    root     3771 Sep  1  2015 .bashrc
-rw-r--r--  1 root    root      655 Jun 24  2016 .profile
-rw-r-----  1 bandit9 bandit8 33033 Dec 28  2017 data.txt
bandit8@bandit:~$ cat data.txt | sort | uniq -u
UsvVyFSfZZWbi6wgC7dAFyFuR6jQQUhR

This time we are piping the contents of the data.txt file first through the sort command and secondly into the uniq command to print only unique entries in the sorted text.

Over the Wire’s Bandit Challenge – Level 7

overthewire

Level 07 – bandit – overthewire

Level Instructions:

“The password for the next level is stored in the file data.txt next to the word millionth”


bandit7@bandit:~$ ls -la
total 4108
drwxr-xr-x  2 root    root       4096 Dec 28  2017 .
drwxr-xr-x 42 root    root       4096 Jul 22 18:42 ..
-rw-r--r--  1 root    root        220 Sep  1  2015 .bash_logout
-rw-r--r--  1 root    root       3771 Sep  1  2015 .bashrc
-rw-r--r--  1 root    root        655 Jun 24  2016 .profile
-rw-r-----  1 bandit8 bandit7 4184396 Dec 28  2017 data.txt
bandit7@bandit:~$ cat data.txt | grep millionth
millionth       cvX2JJa4CFALtqS87jk27qwqGhBM9plV

By piping the contents of data.txt into grep, we are able to search for specific strings, and filter our output, limited to those particular lines in the text.

Over the Wire’s Bandit Challenge – Level 6

overthewire

Level 6 – bandit – overthewire

Level Instructions:

“The password for the next level is stored somewhere on the server and has all of the following properties:

owned by user bandit7
owned by group bandit6
33 bytes in size”


bandit6@bandit:~$ find / -user bandit7 -group bandit6 -size 33c 2>/dev/null
/var/lib/dpkg/info/bandit7.password
bandit6@bandit:~$ cat /var/lib/dpkg/info/bandit7.password
HKBPTKQnIay4Fw76bEy8PVxKEDQRKTzs

Again, using the powerful find command, we can specify the owner, group, and file size of a particular file.  The “2>/dev/null” appended to the end of the command filters and forwards all erroneous returns to /dev/null which can essentially be considered ‘to nowhere’.

Over the Wire’s Bandit Challenge – Level 5

overthewire

Level 05- bandit – overthewire

Level Instructions:

“The password for the next level is stored in a file somewhere under the inhere directory and has all of the following properties:

human-readable
1033 bytes in size
not executable”


bandit5@bandit:~$ ls
inhere
bandit5@bandit:~$ cd inhere
bandit5@bandit:~/inhere$ ls -la
total 88
drwxr-x--- 22 root bandit5 4096 Dec 28  2017 .
drwxr-xr-x  3 root root    4096 Dec 28  2017 ..
drwxr-x---  2 root bandit5 4096 Dec 28  2017 maybehere00
drwxr-x---  2 root bandit5 4096 Dec 28  2017 maybehere01
drwxr-x---  2 root bandit5 4096 Dec 28  2017 maybehere02
drwxr-x---  2 root bandit5 4096 Dec 28  2017 maybehere03
drwxr-x---  2 root bandit5 4096 Dec 28  2017 maybehere04
drwxr-x---  2 root bandit5 4096 Dec 28  2017 maybehere05
drwxr-x---  2 root bandit5 4096 Dec 28  2017 maybehere06
drwxr-x---  2 root bandit5 4096 Dec 28  2017 maybehere07
drwxr-x---  2 root bandit5 4096 Dec 28  2017 maybehere08
drwxr-x---  2 root bandit5 4096 Dec 28  2017 maybehere09
drwxr-x---  2 root bandit5 4096 Dec 28  2017 maybehere10
drwxr-x---  2 root bandit5 4096 Dec 28  2017 maybehere11
drwxr-x---  2 root bandit5 4096 Dec 28  2017 maybehere12
drwxr-x---  2 root bandit5 4096 Dec 28  2017 maybehere13
drwxr-x---  2 root bandit5 4096 Dec 28  2017 maybehere14
drwxr-x---  2 root bandit5 4096 Dec 28  2017 maybehere15
drwxr-x---  2 root bandit5 4096 Dec 28  2017 maybehere16
drwxr-x---  2 root bandit5 4096 Dec 28  2017 maybehere17
drwxr-x---  2 root bandit5 4096 Dec 28  2017 maybehere18
drwxr-x---  2 root bandit5 4096 Dec 28  2017 maybehere19
bandit5@bandit:~/inhere$ find . -type f -size 1033c ! -executable
./maybehere07/.file2
bandit5@bandit:~/inhere$ cat ./maybehere07/.file2
DXjZPULLxYr17uwoI01bNLQbtFemEgo7

Increasing in difficulty, this challenge presents 20 directories with many different files residing within each.  Passing the ‘find’ command enables us to search the current directory for files 1033 bytes in size that are not executable.

Over the Wire’s Bandit Challenge – Level 4

overthewire

Level 04 – bandit – overthewire

Level Instructions:

“The password for the next level is stored in the only human-readable file in the inhere directory. Tip: if your terminal is messed up, try the “reset” command.”


bandit4@bandit:~$ ls -la
total 24
drwxr-xr-x  3 root root 4096 Dec 28  2017 .
drwxr-xr-x 42 root root 4096 Jul 22 18:42 ..
-rw-r--r--  1 root root  220 Sep  1  2015 .bash_logout
-rw-r--r--  1 root root 3771 Sep  1  2015 .bashrc
-rw-r--r--  1 root root  655 Jun 24  2016 .profile
drwxr-xr-x  2 root root 4096 Dec 28  2017 inhere
bandit4@bandit:~$ cd inhere
bandit4@bandit:~/inhere$ ls -la
total 48
-rw-r----- 1 bandit5 bandit4   33 Dec 28  2017 -file00
-rw-r----- 1 bandit5 bandit4   33 Dec 28  2017 -file01
-rw-r----- 1 bandit5 bandit4   33 Dec 28  2017 -file02
-rw-r----- 1 bandit5 bandit4   33 Dec 28  2017 -file03
-rw-r----- 1 bandit5 bandit4   33 Dec 28  2017 -file04
-rw-r----- 1 bandit5 bandit4   33 Dec 28  2017 -file05
-rw-r----- 1 bandit5 bandit4   33 Dec 28  2017 -file06
-rw-r----- 1 bandit5 bandit4   33 Dec 28  2017 -file07
-rw-r----- 1 bandit5 bandit4   33 Dec 28  2017 -file08
-rw-r----- 1 bandit5 bandit4   33 Dec 28  2017 -file09
drwxr-xr-x 2 root    root    4096 Dec 28  2017 .
drwxr-xr-x 3 root    root    4096 Dec 28  2017 ..
bandit4@bandit:~/inhere$ file ./*
./-file00: data
./-file01: data
./-file02: data
./-file03: data
./-file04: data
./-file05: data
./-file06: data
./-file07: ASCII text
./-file08: data
./-file09: data
bandit4@bandit:~/inhere$ cat ./-file07
koReBOKuIDDepwhWk7jZC0RTdopnAYKh

We are presented with 10 different files that the password could be residing within.  The instructions hinted that the password resided within the only human readable file.

Using the command ‘file’ prints additional file information to the terminal. Appending ./* to the end of the file command instructs the file command to print additional information for all files residing withing that current directory.

Over the Wire’s Bandit Challenge – Level 3

overthewire

Level 03 – bandit – overthewire

Level Instructions:

“The password for the next level is stored in a hidden file in the inhere directory.”


bandit3@bandit:~$ ls -la
total 24
drwxr-xr-x  3 root root 4096 Dec 28  2017 .
drwxr-xr-x 42 root root 4096 Jul 22 18:42 ..
-rw-r--r--  1 root root  220 Sep  1  2015 .bash_logout
-rw-r--r--  1 root root 3771 Sep  1  2015 .bashrc
-rw-r--r--  1 root root  655 Jun 24  2016 .profile
drwxr-xr-x  2 root root 4096 Dec 28  2017 inhere
bandit3@bandit:~$ cd inhere
bandit3@bandit:~/inhere$ ls -la
total 12
drwxr-xr-x 2 root    root    4096 Dec 28  2017 .
drwxr-xr-x 3 root    root    4096 Dec 28  2017 ..
-rw-r----- 1 bandit4 bandit3   33 Dec 28  2017 .hidden
bandit3@bandit:~/inhere$ cat .hidden
pIwrPrtPN36QITSp3EQaw936yaFoFgAB

Listing the contents of the home directory reveals a folder named, ‘inhere’.  Because we were instructed the password would be stored within a hidden file, we use the -l & -a switches with command ‘ls’.  The -l switch simply provides a listed format with additional permissions information.  The -a switch reveals all the contents of the directory, including those that are hidden.

Over the Wire’s Bandit Challenge – Level 2

overthewire

Level 02 – bandit – overthewire

Level Instructions:

“The password for the next level is stored in a file called spaces in this filename located in the home directory”


bandit2@bandit:~$ ls
spaces in this filename
bandit2@bandit:~$ cat "spaces in this filename"
UmHadQclWmgdLOKQ3YNgjWxGoRMb5luK
bandit2@bandit:~$ ssh bandit3@localhost

Within the directory is a file named ‘spaces in this filename’.

Because of the spaces within the file, in order to access it, the file name must be enclosed within quotes.  Sure enough, the password for bandit3 is found inside.

Over the Wire’s Bandit Challenge – Level 1

overthewire

Level 01 – bandit – overthewire

Level Instructions:

“The password for the next level is stored in a file called – located in the home directory”


bandit1@bandit:~$ ls
-
bandit1@bandit:~$ cat ./-
CV1DtqXWVFXTvM2F0k09SHz0YwRINYA9

Upon inspecting the home directory, a file “-” is found within.

Executing a quick ‘cat’ of its contents reveals bandit2’s password.

Over the Wire’s Bandit Challenge – Level 0

overthewire

Over the Wire’s  bandit series has proven to be an invaluable resource for students wanting to become better acquainted with the Linux system and bash terminal.

Bandit tests your familiarity with bash syntax and commands with 34 capture the flag-like challenges, each challenge more difficult than the last.  The challenges are accessed entirely over SSH, allowing users to login via Powershell or CMD on Windows, or by terminal from your favorite Linux distro.

Getting Started…

Using your preferred command or terminal prompt, ssh into Overthewire using username “bandit0” and password “bandit0.” (Both without quotes)

The current address for the series is located at bandit.labs.overthewire.org, port 2220.


ssh bandit0@bandit.labs.overthewire.org -p 2220

The objectives to each challenge can be found here.  In addition to providing level objectives, this link provides greater instruction than I will provide here, as well as, hints guiding users towards particular tools that will prove necessary towards achieving the level objective.

* A Note :

If you are unfamiliar with ssh, you will be prompted with an ECDSA fingerprint key when logging in for each level.  This is normal.  Enter ‘yes’ to accept, which will add the fingerprint to the list of known hosts.

 Level 00 – bandit

Level Instructions

 “The goal of this level is for you to log into the game using SSH. The host to which you need to connect is bandit.labs.overthewire.org, on port 2220. The username is bandit0 and the password is bandit0. Once logged in, go to the Level 1 page to find out how to beat Level 1.”

Once logged in, using the ‘ls’ command prints the contents of the current directory and reveals a README file.  Upon examination of the file, using the ‘cat’ command, the password for bandit1 is revealed.


bandit0@bandit:~$ ls
readme
bandit0@bandit:~$ cat readme
boJ9jbbUNNfktd78OOpsqOltutMc3MY1
bandit0@bandit:~$ ssh bandit1@localhost      

Now the next level, bandit1, can be accessed by logging in over ssh with the password acquired.  You can follow the template we used above for logging into overthewire with bandit0, or you can simply address the login to ‘localhost’, as shown above.  Each additional level from here forward can be accessed by simply substituting the username for the next subsequent user.